|
Digital Audio Interface for
Whisper & Other Digital Modes
A simple entry into WSPR (pronounced “whisper”) was my introduction to digital
modes courtesy of Eddie Leighton ZS6BNE and Pierre Van Deventer ZS6A. Watching
Eddie and Pierre play radio via their posts on Facebook in the Zone 38 groups
prodded my curiosity to the point where I wanted to try and see what the hype
was about for myself.
Using Google to try and find a suitable interface leaves a lot to be desired.
There are some which work for some digital modes, nothing clean cut and easily
replicated that I was comfortable to try so I decided to combine all the
research into one interface that would be easy to build and suitable for 95% of
modern transceivers. The primary design I chose was one from KF5INZ with a few
simple modifications to allow for adjusting the audio levels independently of
the Sound Card on the PC, TX/RX indicator, and if possible USB integration.
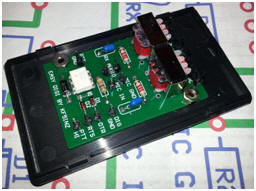
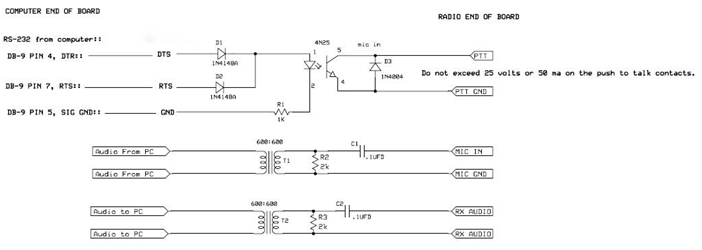
The basic circuit diagram from KF5INZ is as follows… This in itself works
perfectly, however, the audio levels are a little iffy and depending on if you
are using the data port on your radio or the speaker output, a little difficult
to balance perfectly.
|
|
Adding an LED and a 1k resistor across the RTS/DTR line and GND, allows for a
RX/TX indication when the RTS/DTR line goes high on transmit.
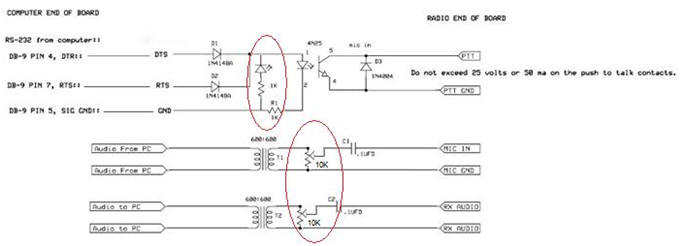
Replacing
R2 and R3 with a 10K variable resistor with the wiper connected to C1 and C2
respectively, allows for the adjustment of audio levels in and out. These can be
mounted on the front panel of the enclosure for easy access or you can use
preset devices and keep them inside the enclosure. I opted for the latter and
drilled two 3.2mm holes in the side of the case which allows me to insert a
trimming tool and adjust the audio levels to my requirements.
Connecting the interface to my transceiver was a simple process using the eight
pin din accessory socket on the back of the radio. Following the user manual I
determined which pins were for audio in/out, PTT and ground; these were wired to
a short lead and to the eight pin DIN plug.
Lastly, I wanted to make the whole thing work as closely as possible to what is
provided by a professional Signalink device I wanted to have a USB interface
instead of leads to my internal sound card… I picked up a handful of these USB
3D sound cards a while ago at a flea market for a few rand each. This would work
perfectly for what I had in mind. |
|
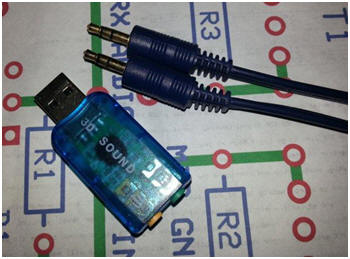
Removing
the sound card from the casing, desoldering the audio sockets for line input and
speaker output was simple enough. Connecting the digital interface to the
soundcard input and output was just as easy, remembering that only one channel
was required. I cut a slot in the side of the enclosure to allow the USB port to
protrude once mounted to the inside of the enclosure and for the standard USB
extension cable to fit.
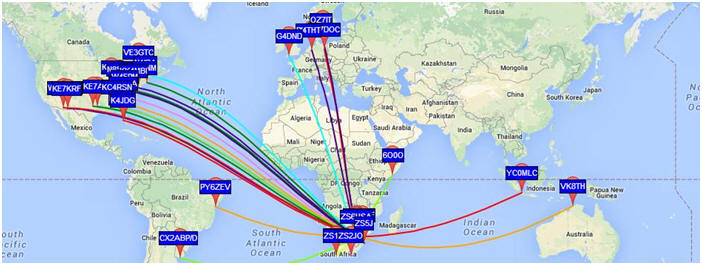
There we have it, a simple interface that is suited for WSPR and other digital
modes. Since building the device I have been actively involved in chasing WSPR
DX working as far as possible using as low power as I can to see how well it and
my station can perform. I am absolutely hooked on digital.
Happy building and hope to work you on WSPR or one of the other digital modes
soon
For a printable version of this project please click on the
link
here
|
|
